Wednesday, April 16, 2014

Photo shoot

I have a lovely friend, Rebecca, that happens to be a photographer and she wanted to take some pictures of my plants! How flattering. Especially since it was still winterish at the beginning of spring time. They were looking pretty sad, a lot of them. But this is what happened. And if you like what you see, I will post Rebecca's information at the end of this post!


That's right, folks. She made my plants look like a dream. It's nice to see something you love through someone else's eyes sometimes. I believe in documenting things even if you are unhappy with them at the time. These pictures are a reminder to me that when I think things are ugly and not going well, through someone else's eyes they are wonderful and beautiful. Perspective is everything.


You can find Rebecca on facebook here!
https://www.facebook.com/HoneyBunnyPhotography


Sunday, October 20, 2013

Fall Succulent Pumpkins

Happy fall everyone! I have noticed that these cute little succulent pumpkins are becoming a popular thing lately so I thought I would show anyone who doesn't already know how to make them.
First thing you will need to choose your pumpkins. I made two but for you guys I photographed this cute tiny white pumpkin. The reason being that it is adorable.


You will also need sphagnum moss.....


...a glue gun with glue sticks, scissors or garden shears, tweezers, and succulents.


Here are the tiny succulents that I grew from leaf cuttings. I thought they would work perfectly since they are so small and so is my pumpkin. You can buy succulent cuttings in bulk online or just buy some succulent plants at a local greenhouse. Some of you are probably thinking to yourself "A hot glue gun to glue my plants??!!?!?". It sounds bad but it really isn't. They can handle the hot glue without damage and can actually continue to root through the glue. Succulents are amazing. You could use craft glue instead but I prefer the hot glue gun since it dries so fast.


You will take some of your sphagnum moss and glue it to the top of your pumpkin. Mine is completely dry because I didn't know how well glueing wet moss would work.


I only put moss part of the way around the stem on this one because I love the curly little stem and I wanted it to have it's own space. You can put moss all the way around your stem or wherever you want on your pumpkin.


Now you can start glueing your succulents. I just cut them to the size I wanted and put the glue directly onto the stem and stuck it on. This is where the tweezers may come in handy.


Then I glued some more...


And some more till I had all that I wanted.


Here they are, all ready for fall! You can mist them once in a while if you want. The sphagnum moss will hold some of the moisture and give them a place to root. Just make sure they are completely dry between waterings. They should continue to grow for you and every once in a while make sure they get some bright but not direct sunlight. And when the pumpkins start to rot, they can be taken off and replanted them into soil.


This is what I love so much about succulents. They can take having their heads cut off, hot glued to something for a long time, then replanted and the keep going like nothing happened. Simply amazing. If there is anything you guys would like to know how to make or grow when it comes to succulents please comment and I will try my best to make a post about it!
Enjoy!


Wednesday, June 19, 2013

Succulent Fanatics


This is a post dedicated to all my friends in the Succulent Fanatic group on Facebook! I love being apart of this group of intelligent people who help me answer questions and identify plants. It has been a great way to exchange ideas and meet people who love succulents as much as I do. 


If you have not yet joined this group and you love succulents to, click on one of my links in this blog to join. We would love to have you! I hope I can meet some of you someday soon. But until then, happy planting!


Sunday, June 9, 2013

Grafted Moon Cactus

Anyone ever had one of these? I have. Several. My friends have had them to. Everyone of them I've ever owned or someone I knew owned have all died with in a few weeks. I want to know why. I saw some at a greenhouse that looked healthier and happier then any I had ever seen. I asked an employee about them and she told me that it's because they are actually grafted together and the ones from my local home improvement stores are glued together the same as the flowers they glue onto every single cactus they sell. Dumb.


So I bought one to take apart and see if it really was glued together. I took the top colored cactus off the green one and found no glue. Still confused. But I did look up some information about them and found that the top part has no chlorophyl and that is why they are never green. Since it doesn't have chlorophyl, it must be grafted to a green cactus that does because chlorophyl is what plants use to make food. So supposedly the colored parts will not survive without the green part. This makes perfect sense. But I have always wanted to try and pull the little babies off of one of these and try to grow them. So that is what I am trying now.


Here are some of them. I have put them all into my growing tray under my plant light and we will see what happens. I have also kept the green part of the cactus and the larger colored part. The colored part is sitting on a plate so that it will hopefully callous over and I will try to root it. I will be watching the green part as well to see if it decides to grow! Updates to come.


Saturday, June 8, 2013

DIY Succulent Bird Feeder

My cousin was in town for a week and during her visit we decided we needed to do a few DIY's for you guys! We hope you like them. These are the things you will need to make a succulent bird feeder like ours.


You will need soil, a bird feeder, sphagnum moss, fishing line, a stick or tweezers, something to scoop dirt, and a bowl of water. If you want, you can add some bonemeal to your soil. (We forgot to!!) You will also need plants that can fit inside those little metal squares on your bird feeder. We chose this large tray of mixed sedum and these little white fuzzy guys that I'm not sure the name of.


The first thing we did was soak a few handfuls of sphagnum moss in water.


We the tied the end of our fishing line to the bottom of our bird feeder.  (We skipped the wrapping the line to a stick part like in my wreath making tutorial because it's actually much easier to just go straight from the role of fishing line!)


Then we found a ladybug in the sedum. (Optional)


And then we began to cover our bird feeder with the sphagnum moss. This part took both of us to do since it's a vertical tube shaped bird feeder. One added moss while the other wrapped with the fishing line.


Once we made it to the top we wrapped it up and down one more time to get any loose pieces secured and tied it off on the top of the bird feeder. Next we filled it up with soil. You can mix some bonemeal into the soil if you want. 


I left about an inch of space at the top since the topper on my bird feeder had a rim that fits inside of it. The next thing we did was divide up some plants small enough to fit through those metal squares.


(We took those pieces apart till they were individual pieces of sedum.)


We then took our chop sticks and started to poke holes into the moss and through the bird feeder and started to stick plants in. I later found that it's almost easier to use tweezers to plant the sedum. You just grab a piece of sedum with the tweezers and stick it right in the moss.


This part takes a long time and I actually have not yet finished it because I have been running low on projects lately so I'm trying to drag it out and enjoy it for a long time. But here's a picture of how much we finished that day!


I hope you enjoy this DIY and make one of your own. Post a link below if you do or if you have your own projects, I'd love to see what you guys are doing to!

Special thanks to my sweet cousin Olivia for being in my blog and helping me out!  I couldn't have done it without you. =] I love you!


Sunday, May 19, 2013

You can stay as long as you like.

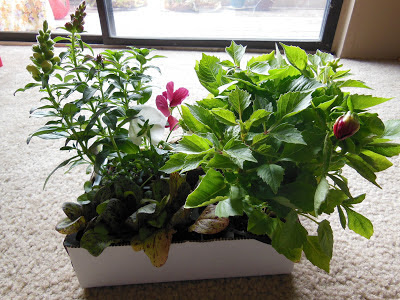
Today is a semi-cloudy, plant buying, James Taylor kind of day. I went to a new greenhouse to buy a few plants with tips that I received this past week at work. My favorite thing in the world is a box of plants. It's literally the best thing. 


I've been wanting just a few flowers to bring a little color to my balcony. I am looking foreword to having my own flowers to admire and pick. I would love to have fresh flowers on my table everyday if I could! Someday I will.


I also want a few vegetables. I chose this lettuce, mostly because it's beautiful and can stand the partial sun from our balcony. I wanted a tomato plant but there were so many different kinds I didn't know where to start! I will have to do some research on that and bring one home next time. 


When it came to the pansies and snap dragons, it really wasn't even a question wether I would be bringing them home. Both, especially the snap dragons are flowers I remember from when I was a kid. My mom always had them in her flower pots. I remember my brother and I would always squeeze the snap dragons to make their mouths open. My husband didn't know this was possible so I had to get him some for entertainment this summer. I can't wait for them to bloom!


Monday, April 29, 2013

DIY Fairy Garden

Once more, I took a class at Phelan Gardens. This time it was a Fairy Garden class. My camera died before I could take one picture so I apologize for the bad-ish quality of the photo's. All of the instructional photo's are from my phone and when I got home I took more pictures with my camera. 

These are the materials that we used: 
  • I used a plastic bowl, but you can use any container you want. I've people use broken pots, small wagons or glass bowls, etc. (My next project will be in a broken pot if I can break it how I want!)
  • A cup of gravel, the teacher at the class suggested fish tank gravel because it keeps it's color well. 
  • A cup of sand, if you buy it from a craft store make sure it says it can be used with plants. Some decorative sands can't.
  • Soil, we used Fertilome soil. From what I gathered it doesn't have any fertilizers in it. Since this is a garden in such a small container with relatively small plants you don't want fertilizer to encourage fast growth. The idea is to keep things small. This type of soil also will not give you gnat larva! Hooray!!
  • Stones, drift wood, marbles, small furniture or whatever else you want to decorate with.
  • Small plants. I used hens and chicks, irish moss, creeping jenny, an eugenia bonsai tree, and some other small tree looking things that I never did catch the name of. Click here for a website that has a list of plants you could use that will stay relatively small!


I started with my plastic bowl and filled it to the top with soil.


Then I took my eugenia bonsai tree out of it's pot. We started with the largest plant so that it would be easy to create a focal point. We did not loosten the soil around it's roots because if you leave them a little bound up it will grow slower and will stay smaller longer. As it grows you will probably want to trim it.


I put the tree a little off center because I had planned a tiny camping ground in the middle. I wanted the tree to kind of draw your eye down to the small tent that would later live at the bottom.


I then dug where I wanted my path and camping area to later go. This is just planning ahead for where your gravel will be. Make sure you leave plenty of space around it to put plants. 


Here are my plants! That was one thirsty creeping jenny... but it's one of my very favorite plants so I had to take it anyway. In the words of Charlie Brown, I think it needs me.


Then I added some plants. My goal was to create a small forest with an over grown path going through leading to the tent. I planted my tallest plants first and moved down to shortest, I just found this most easiest for me.


Gradually I added more plants, stones, and my drift wood. I also filled my path half way up with sand. I  learned that this will help to wick water to all of the plants while watering.


Then I covered my sand with gravel. 


This is what it looked like when I got it home! I then got to work on adding things I made or already had. Finally a use for the sea shells I got on my honeymoon in Florida!


I made a tiny tent and a trellis. The trellis, my dachshund prefers most out of anything else to pull out and drag all over the house trying to eat it. She loves to choose a favorite thing about each of my projects to try to eat while I'm taking pictures for my blog. She loves me enough to give me challenges I guess!!


When watering these gardens you will pour the water on the gravel. Certain plants will tell you when to water, like the creeping jenny or the irish moss. They will get very droopy and sad. You will also want to mist everything else with a spray bottle. Also, they will need diffused sun light. 
If you have any questions, feel free to comment and I will answer! Thank you for reading!