Today is the day! I've been looking foreword to making this tutorial for you since I made my first wreath. I really enjoyed making another one at home and I'm so excited to show you how to do it! I already showed you what materials you would need and if you didn't get to read that blog I will link it for you right here. I will try to be as clear in my instruction as possible but if you still have any questions about this post or the material posts please comment them and I will respond!
First thing, you will want to fill your bowl about half way with water and put some of your sphagnum moss into it and mix it around. It doesn't matter if the water is hot or cold, which ever you prefer. I started with about a quarter of the moss in the bag. I would recommend to just add more moss as you go, at least towards the end anyway, because there's really nothing you can do with extra wet moss except put it in your compost. Mix it well in the water because if it's still dry it will fall apart while you're building your wreath. Also, now is a good time to separate any of your plants if you bought some with multiple plants in the same pot. I used a large flat storage box with a towel under it. I separated my plants in the box and used the lid to make my wreath on. It was pretty handy because I didn't have to have dirt everywhere and the lid kind of bent down in the middle so all the extra water ran there instead of all over the floor. But you can use any hard surface you want! A storage box is just my "I live in a small apartment with not many surfaces I want to get wet and dirty" advice.
I then put the lid back on my box and put my wreath form on the lid. This is when I put my fishing line onto my chop stick so if you haven't done that yet you will want to do that now. And if you don't know how click here for an explanation!
This is where you start to get messy so you'll want to be wearing a short sleeved shirt or role up your sleeves and just get ready to be mossy. You can now start covering the top of your wreath form with moss. This will be about half the thickness of your wreath so don't be afraid to pack it on, especially because once you start to wrap it later it will shrink about 50% if you wrap it right. Once you get it covered in moss you will make a dent all the way around it. Like a little wreath trench about half an inch deep.
This is a good time to check on your cute little dachshund puppy taking a nap behind you!! Ok, maybe she was just behind me. Back to wreath making!!
Now you can fill your little trench with soil. Just enough to make the wreath flat on top. Then you will take your bone meal and sprinkle it on top of the dirt all the way around. Use about two spoon fulls.
You will use more of your sphagnum moss to cover the dirt and bone meal. This is where you'll really want to pile it on. Like I said before, when you start to wrap with fishing line it's going to shrink a whole lot. You want to be able to grasp it with your hand but not have your fingers touch.
Yay!! Now you are ready to wrap.
You will tie the end of your fishing line to the wire form on the outside or inside, whichever is easier for you. Tie a few knots so it doesn't come loose. This is where the tweezers can come in handy, it can be difficult to tie those little knots.
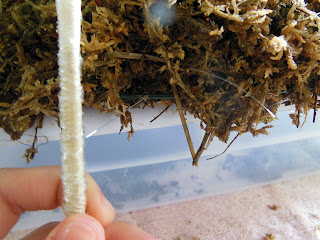
I know it's a little hard to see where you've already wrapped when you start but I would suggest trying to make each wrap about a quarter size apart. You can wrap closer if you want but I've found that it's a little more difficult to get your plants in later if it's wrapped very close. You'll want to wrap it as TIGHTLY as you can. If it's wrapped too loosely or too far apart your moss will fall out when it's dry. After you put your plants in you can wrap some more. Did I mention to wrap it as tight as possible? Ya, do that. And if you run out of wire before you've gone all the way around just tie the line off on the wire form again like you did the first time and add more line to your stick. You will then tie it to the form again and go back to wrapping.
If you're wrapping tight enough you should notice it shrinking like at the bottom of my wreath here in the picture above.
When you've gone all the way around, tie it again to the form and cut off the fishing line. Don't forget to trim all those little pieces of fishing line that might be sticking out.
Then I took my lid off my box so that I would have a place to put some soil and prepare my plants.
I tried to loosen the soil around the roots as much as I could without hurting the roots so that I wouldn't have to fit as much into the holes I dug into my wreath.
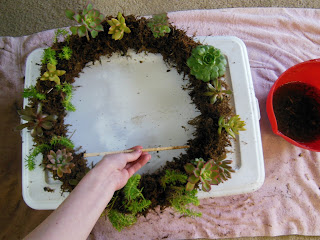
Now you will use your stick to dig a hole large enough to fit your plants.
And then you can put your plant in the hole! It may feel a little bit like your having to cram them in, but it's fine as long as the roots don't get broken off.
As I went on I placed my plants around the wreath where I wanted them to be planted.
As you can see, this project isn't always chop stick friendly. It probably didn't help that my puppy kept taking all of my chop sticks and tried to eat them between each picture. However, no chop sticks were consumed in the making of this wreath. Two thumbs up.
Once you have all of your plants in the wreath and you're happy with it, you can wrap it some more with fishing line and add a little more moss to cover any dirt left showing.
Now you have your very one succulent wreath! It will need to be soaked completely once every week. I was told to even put it in my bath tub and let it soak for a few minutes. That's what I mean by "soak". And you'll need to leave it laying down for a few weeks while the roots develop other wise your plants might just fall out. You can lay it on a platter and make it a center piece on a table until then if you want! It can also be left laying down, you don't have to hang it up. It may look a little bare but don't fear, succulents reproduce. So as you see new babies on your plants you can cut them off and stick them back into your wreath.
Both of the wreaths that I made have not been hung yet and I actually don't know what to use to hang them. But once they are rooted enough I will learn how and make another post so that you can hang yours to. So make sure you watch for that in the days to come!
I hope you had as much fun as I did and that you were able to make a wreath of your own! Thank you so much for reading!!!


No comments:
Post a Comment